
Sarvangasana Pose and Benefits
Three words make up Sarvangasana: Sarva, which means “entire,” Anga, which means “body part,” and Asana, which means “pose.” This means “Pose for All Body Parts” in English.
Because it benefits both the body and the mind, Sarvangasana, also known as Shoulder stand Pose, is known as the “Mother of all Yoga Poses.”
Benefits of Sarvangasana:
Health (Anatomical) Advantages
- Strengthens Shoulders: Strengthens, tones, and stabilises the shoulders while reversing sagging shoulders.
- Strengthens Neck: Strengthens neck to prevent stiff neck and/or relapse of spondylitis.
- Wonderful for runners: hamstrings, calf, and leg muscles are all toned.
- Back Strengthening: Lifting the back and maintaining body balance make the back stronger.
- Spines Strengthening: increased flexibility and strength, which helps the nervous system function better.
Health Advantages
- Stimulates glands: The thyroid and parathyroid glands are stimulated, which balances the hormones in both men and women.
- Brain Rejuvenation: As the blood flow is reversed, the brain receives more blood.
- Heart muscles are stretched because the heart must work harder to pump blood to the extremities due to the reversed blood flow.
- Enhances Digestion: Relieves constipation and enhances digestion.
- Relieves Varicose Veins: When the legs are raised, the blood flow is reversed, which relieves constricted varicose veins.
- Enhances Vision: The increased blood flow to the brain enhances vision.
- Reduces Body Weight: burns fat in the buttocks, thighs, hips, and belly.
- Treats disorders: thyroid disorders, asthma, reproductive issues, headaches and migraines, diabetes, insomnia, and hypertension.
- Manages Symptoms of Various Disorders: relieves depression, bronchitis, asthma, nasal congestion, haemorrhoids, headaches, constipation, hypertension, and insomnia.
Contraindications to Shoulder stand:
Although Sarvangasana / Shoulder stand has many advantages, there are several situations when it should not be performed, as detailed below.
- Back Pain: Stay away from this position if you have significant back pain or a spine injury.
- Spondylitis: If you have spondylitis or are receiving therapy for it, stay away from this stance.
Under the direction of a skilled yoga therapist, however, this yoga position might aid in healing minor spondylitis cases.
- Heart Problems: People who have heart issues, are elderly, have less flexibility, or have trouble controlling their bodies may wish to avoid this posture or seek advice from a yoga instructor.
- Internal Organs: This yoga posture should be avoided if one has weak internal organs, such as the spleen, liver, or kidneys, or if one’s thyroid is swollen.
- High Blood Pressure: A person who suffers from migraines or high blood pressure
- Pregnant or Menstruating: This category includes both pregnant and menstruating women.
- Throat or Ear Infection: If you have a throat infection or an ear infection, you should avoid using this posture since the blood flow might cause pain in the muscles around the afflicted area.
- If the condition is not severe, a qualified yoga instructor or therapist may address most contraindications.
STEPS:
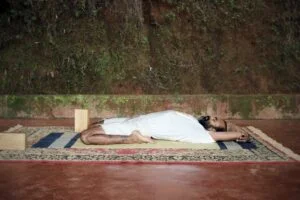
Place your hands and feet next to your body while lying supine on the mat. Keep your mind at ease, relax your body, and take a deep breath in and out.
- As you exhale, bring your feet up to your hips and curl your legs towards your thighs.
- Elevate the lower body vertically by gently pulling in the abdominal muscles and using the hands as support (fingers under the hips and the thumbs above).
- The entire body weight should be supported by the head’s palms, elbows, neck, and back (final position).
As you do the tasks mentioned above in 4 seconds, breathe out. - Hold this position for no more than two minutes or as long as it is comfortable. Breathe gently, naturally, and regularly.
- While supporting your hips with your hands, exhale and slowly lower yourself back to the starting position.
- Let go of the hands behind you to return to the starting position.
- After a few deep breaths, rest for a while before starting to breathe normally.
When you have mastered Ardha-Sarvangasana, proceed to Sarvangasana by doing the following:
- After exhaling, elevate your legs to create a right angle with your torso.
Keep your legs straight and your body undisturbed on the ground above the hip joint. - While still breathing, raise the arms, tighten the waistband, and press the body as high as possible.
Your legs should be elevated while you lay your whole weight on your arms and elbows. - Once this posture is firmly established, attempt to slowly move the hands towards the waist with the fingers extended to the back of the hip bones and the thumbs gently pushed on both sides of the navel.
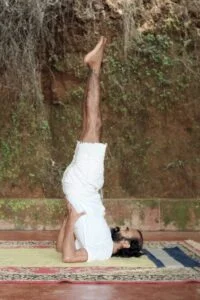
- Place the chin in the jugular slot and place your full head weight on your neck, back, and shoulders (final position).
As you do the aforementioned tasks in 4 seconds, breathe out. - Hold this position for two minutes or as long as it is comfortable. Breathe gently, naturally, and regularly.
- In 4 seconds, while breathing, slowly and gently bend the knees, and descend the hips to the mat with the help of the hands.
- Let go of the hands behind you to return to the starting posture.
- Inhale deeply for a few breaths, then let yourself unwind for a while before breathing normally.
Sarvangasana / Shoulder stand Modifications:
- A blanket behind the neck and shoulders will support and ease the stance.
- Not everyone can elevate their legs to 90 degrees precisely.
- Yoga practitioners might thus begin with folded or angled legs in the meantime.
- Another option is to elevate your back off the floor and use the wall as support by putting your legs up high on the wall.
- Half Sarvangasana: To practice the half Sarvangasana and gain confidence, place one leg on the wall and the other at a 90-degree angle.
- Chair support: By keeping the chair near the hips and lower back, one can utilize a comfortable chair to raise the hips.
- Companion to support the legs in the air: The instructor might support your legs as you raise them to 90 degrees, providing you the assurance to keep the position for a longer period.
FAQs
1) How Often Should We Perform Sarvangasana / Shoulder Stand?
You can maintain your health by performing Sarvangasana for just one minute each morning and evening. You can hold the position for longer periods, but no longer than five minutes.
2) Can You Perform Sarvangasana / Shoulder Stand During Your Period?
Sarvangasana, which requires inverting the body, should not be practiced during periods.
It should be avoided during periods because it can cause problems with vascular obstruction and heavy bleeding. Yoga asanas like Balasana, Dandasana, Kumbhakasana (Plank Pose), and Paschimottanasana can help menstrual health without causing physical discomfort.
When the energy flow is managed with the right awareness of the body and a rhythmic flow of breath across the entire body, Sarvangasana (Shoulderstand Pose) is beautiful. Even if challenging, you should not skip this lovely yoga posture if your body permits it.
Contact Us